

Brining chicken is one of those kitchen tricks that transforms your cooking from good to great. Have you ever wondered how some chickens come out so juicy and tender, even after roasting or grilling? The secret lies in brining! This simple process locks in moisture, enhances flavor, and ensures your chicken is perfectly tender every time. Whether you’re cooking a whole chicken or just a few breasts, brining takes minimal effort and guarantees big results. Imagine biting into juicy, flavorful chicken that practically melts in your mouth—sounds amazing, right? In this recipe, I’ll walk you through how to brine chicken the easy way, with a few simple ingredients you probably already have in your pantry. Ready to elevate your chicken game? Let’s dive in!
Table of Contents
Key Benefits of Brining Chicken
Brining chicken isn’t just a technique—it’s a game changer for home cooks and seasoned chefs alike. If you’ve ever wondered how restaurants manage to make their chicken so juicy and flavorful, the secret often lies in brining. Here’s why you should give it a try:
- Moisture Retention: One of the biggest struggles when cooking chicken is ensuring it doesn’t dry out, especially during roasting or grilling. Brining helps solve this problem by allowing the chicken to absorb extra moisture, which stays locked in during cooking. The result? Chicken that’s juicy and tender all the way through. Serious Eats explains the science behind brining meat in more detail, breaking down why this moisture retention works.Salt, when dissolved in water, helps break down proteins in the chicken, making it more tender. So, if you’ve struggled with tough or chewy chicken in the past, brining could be your new best friend. This is especially helpful for lean cuts like chicken breasts, which tend to dry out faster.
- Flavor Infusion: Brining isn’t just about adding moisture—it’s also about infusing flavor. When you soak chicken in a seasoned brine (salt, sugar, and any herbs or spices you choose), it doesn’t just coat the outside; the flavors penetrate deep into the meat, giving it a delicious, well-seasoned taste from the inside out.
- Tenderness: Salt, when dissolved in water, helps break down proteins in the chicken, making it more tender. So, if you’ve struggled with tough or chewy chicken in the past, brining could be your new best friend. This is especially helpful for lean cuts like chicken breasts, which tend to dry out faster. The Science of Brining covers how salt affects the texture of meat and how to get the perfect tenderness.
- Simple and Effortless: While the benefits are huge, the process itself couldn’t be easier. With just a few ingredients, a bit of time, and no special equipment, you can dramatically improve the texture and flavor of your chicken.
So, whether you’re preparing a whole chicken or just a few breasts, brining is an easy, low-effort way to elevate your dish. The best part? You can customize the brine to your taste, adding herbs, spices, and even a bit of citrus to create your own signature flavor.
Ready to see how it’s done? Keep reading as we break down the simple steps to brine chicken for perfect tenderness and flavor!
Brine Chicken Ingredients
Now that you’re excited about brining your chicken, let’s dive into the ingredients you’ll need. Don’t worry—this recipe is simple and doesn’t require a lot of special items. Most of these ingredients are kitchen staples, so you’re probably already halfway there!
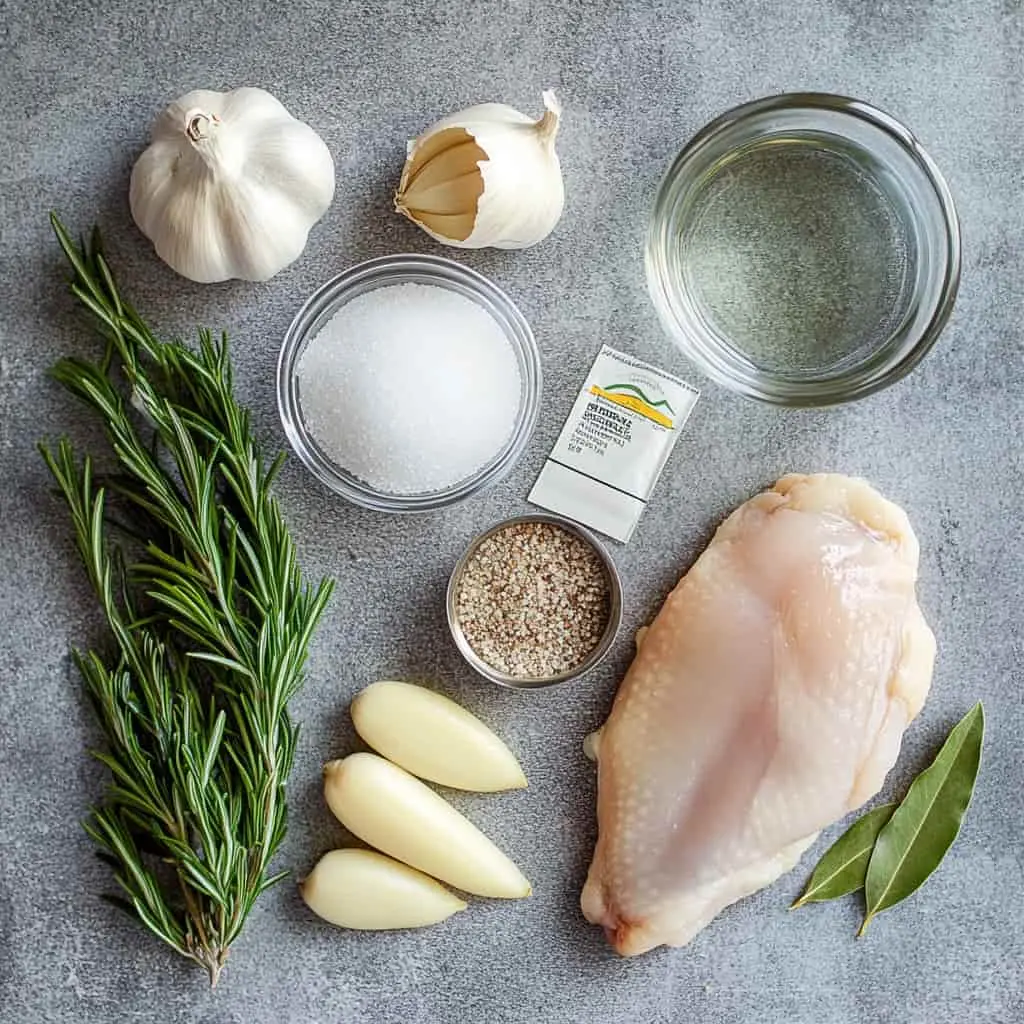
Here’s what you’ll need to create the perfect brine for chicken:
- 4 cups of water – This will form the base of your brine solution. Make sure you have enough to fully cover the chicken.
- 1/4 cup kosher salt – Kosher salt is ideal because it dissolves easily and doesn’t make the brine too salty. If you’re using regular table salt, you’ll need to cut the amount in half since it’s finer.
- 1/4 cup sugar – The sugar in the brine helps balance the saltiness and creates a subtle sweetness that enhances the chicken’s natural flavor.
- 2 cloves garlic, crushed – Garlic adds an aromatic depth to the brine, infusing your chicken with a rich, savory flavor.
- 1 tablespoon black peppercorns – Whole peppercorns give a mild heat and earthiness to the brine, elevating the overall taste.
- 2 bay leaves – These lend a subtle, herbal flavor that complements the other ingredients perfectly.
- 1 teaspoon dried thyme or rosemary (optional) – Adding fresh or dried herbs like thyme or rosemary takes the flavor profile to another level, but feel free to experiment with whatever herbs you love!
These ingredients combine to create a well-balanced brine that locks in moisture and infuses incredible flavor into your chicken.
Pro Tip: Customize Your Brine!
One of the best things about brining is how customizable it is. Feel free to play with the ingredients to suit your personal taste. Want a citrusy kick? Add lemon slices or orange zest to your brine. Looking for a little heat? A couple of crushed red pepper flakes could be just the thing to spice things up. The possibilities are endless!
Once you’ve gathered your ingredients, you’re ready to move on to the next step: preparing your brine. Let’s get started!
How to Make Brine Chicken
Making brine for your chicken is incredibly simple and doesn’t require any special equipment. All you need is a little patience, and your chicken will be transformed into a juicy, flavorful masterpiece. Let’s break it down into easy steps:
- Prepare the Brine Solution
Start by combining your ingredients in a pot or large bowl. Add the water, kosher salt, and sugar, and stir until the salt and sugar are completely dissolved. This is your base brine.- Tip: If you’re in a hurry, you can warm up the water a bit to speed up the dissolving process, but make sure to cool it down completely before using it on the chicken.
- Add the Aromatics
Once your base is ready, add in the garlic, black peppercorns, bay leaves, and any other herbs you’re using (like thyme or rosemary). Give it a stir to ensure everything is well distributed. The aromatics will infuse the chicken as it soaks, creating a flavorful depth. - Cool the Brine
If you’ve used warm water, let the brine cool down to room temperature. You don’t want to put hot brine on the chicken, as this can begin to cook the meat prematurely. This step is crucial—make sure it’s cool before moving on!- Tip: If you’re short on time, place the pot in the fridge or even a sink filled with ice water to cool it quickly.
- Submerge the Chicken
Once your brine has cooled, place the chicken (whole or parts) into the solution. Make sure the chicken is fully submerged. If you’re brining a whole chicken, it may be helpful to use a large container or even a gallon-sized resealable bag to ensure it’s evenly soaked.- Tip: For best results, make sure your chicken is fully covered. If it floats above the brine, add a little more water.
- Brining Time
Now for the waiting game! Let the chicken sit in the brine for:- Whole chicken: 4–6 hours
- Chicken breasts or thighs: 1–2 hours
The longer the chicken soaks, the more flavor it will absorb. But don’t overdo it—brining for too long can make the meat too salty.
- Rinse and Dry
After the brining time is up, remove the chicken from the brine and give it a quick rinse under cold water. This helps remove any excess salt and herbs that might make the surface too salty. After rinsing, use paper towels to thoroughly dry the chicken. The drier the skin, the crispier it will become when cooked! - Cook and Enjoy!
Now that your chicken is perfectly brined, it’s ready for the final step—cooking! Whether you’re roasting, grilling, or frying, you’ll notice a significant difference in the tenderness and flavor. The chicken will stay moist throughout the cooking process, giving you a juicy, flavorful result every time.
And that’s it! Brining chicken is a simple but incredibly effective way to level up your cooking. Whether you’re a beginner or an experienced cook, this technique guarantees delicious, moist, and flavorful chicken that everyone will love. Ready to cook up that brined chicken? Let’s move on to some tasty serving suggestions in the next section!
Serving Suggestions
Now that your chicken is brined to perfection, let’s talk about how to serve it up! Brined chicken is incredibly versatile, so you can pair it with a variety of sides to create a well-rounded meal. Whether you’re looking for comfort food or something light and fresh, here are a few serving ideas that will complement the juicy, tender chicken you’ve just prepared.
1. Roasted Vegetables
A simple side of roasted vegetables is a fantastic way to balance the richness of the chicken. Try roasting carrots, Brussels sprouts, sweet potatoes, or parsnips with a drizzle of olive oil, salt, pepper, and your favorite herbs. The caramelized edges of the veggies pair beautifully with the tender chicken, making for a delicious and nutritious side dish.
- Tip: Toss the veggies with a little garlic and fresh thyme before roasting for extra flavor.
2. Creamy Mashed Potatoes
What’s better than a hearty serving of creamy mashed potatoes to go with your brined chicken? The buttery, smooth texture of mashed potatoes complements the juicy chicken perfectly, creating the ultimate comfort food combination. For an added twist, fold in roasted garlic or a bit of cream cheese to make the mash extra indulgent.
- Tip: Top with a drizzle of chicken gravy for even more flavor!
3. Crisp Green Salad
If you’re in the mood for something lighter, a crisp green salad is a great way to balance the richness of the brined chicken. A fresh salad with mixed greens, cucumber, tomato, and a light lemon vinaigrette can add a refreshing contrast to the savory chicken.
- Tip: Add a few slices of avocado or some feta cheese to make the salad more filling.
4. Rice Pilaf or Quinoa
For a healthy yet hearty side, serve your chicken with rice pilaf or quinoa. Both options are light enough to let the chicken shine but filling enough to round out the meal. You can sauté the rice or quinoa with onions and herbs for extra flavor.
- Tip: Garnish with fresh parsley or toasted almonds for a bit of color and crunch.
5. Grilled Corn on the Cob
For those warm summer nights, grilled corn on the cob is a fantastic choice. The smoky flavor of the grilled corn pairs perfectly with the brined chicken, and you can add a bit of butter, lime, and a sprinkle of chili powder for an extra kick.
- Tip: Brush the corn with garlic butter right before grilling for a richer flavor.
6. Lightly Sautéed Spinach or Kale
If you’re looking to add some greens to your meal, lightly sautéed spinach or kale is a quick and easy option. Just toss the greens in olive oil, garlic, and a splash of lemon juice for a vibrant side that will complement your brined chicken beautifully.
- Tip: Add a handful of raisins or pine nuts for a touch of sweetness and texture.
7. A Glass of Wine
To round out your meal, consider pairing your chicken with a glass of white wine like Chardonnay or Sauvignon Blanc. These wines complement the juicy, flavorful chicken while offering a refreshing contrast. If you’re more of a red wine person, a light Pinot Noir works great too!
With these serving suggestions, your brined chicken is sure to be the star of the show. Whether you’re feeding a crowd or just enjoying a weeknight dinner, these sides add the perfect finishing touches. The best part? You can mix and match based on what you’re in the mood for, creating endless possibilities for each meal. Enjoy your flavorful, juicy chicken!
Conclusion
Brining chicken is an incredibly simple technique that makes a world of difference in the final result. By soaking your chicken in a flavorful brine, you’re guaranteed juicy, tender, and perfectly seasoned meat every time. Whether you’re cooking a whole chicken or just a few pieces, brining elevates the dish and ensures that your chicken turns out just the way you want it—moist, flavorful, and irresistible.
The beauty of brining lies in its versatility and ease. Once you get the hang of the process, you can experiment with different herbs, spices, and even citrus to make the brine your own. The best part? It requires minimal prep time and delivers maximum flavor, making it an essential technique for any home cook.
So, whether you’re preparing a weeknight meal, hosting a family gathering, or simply want to enjoy a perfectly cooked chicken, brining will quickly become your go-to method for success in the kitchen.
Ready to brine your chicken? The next time you want a dish that impresses with minimal effort, reach for that brine solution and let the magic happen. Enjoy your perfectly tender, flavorful chicken, and most importantly, have fun with the process!
FAQs
Brining chicken is an easy and foolproof way to achieve juicy, flavorful meat, but you might have a few questions along the way. Let’s tackle some of the most common ones to make sure your brining experience is as smooth as possible!
1. How long should I brine chicken?
Whole chicken: Brine for 4–6 hours. This will give the chicken plenty of time to absorb all the flavor and moisture.
Chicken breasts or thighs: Brine for 1–2 hours. These cuts don’t need as much time since they are smaller and will absorb the brine quicker.
Pro tip: If you leave the chicken in the brine for too long, it can become too salty, so be sure to follow the recommended times for best results!
2. Can I substitute table salt for kosher salt?
It’s best to use kosher salt when brining chicken. Kosher salt has larger crystals, which makes it easier to dissolve and more evenly coat the chicken. If you must use table salt, be sure to halve the amount since it’s finer and can make the brine overly salty.
3. Can I brine frozen chicken?
Technically, you can brine frozen chicken, but it’s better to thaw it first. If you brine frozen chicken, it won’t absorb the brine properly, which can affect the texture and flavor. Simply thaw your chicken in the fridge overnight before brining for optimal results.
4. What can I add to the brine for extra flavor?
Feel free to get creative with your brine! Here are some additions that can elevate the flavor:
Citrus: A few slices of lemon or orange will add a fresh, zesty note.
Herbs: Fresh rosemary, thyme, or sage will infuse the chicken with a subtle earthy flavor.
Spices: Try adding a pinch of cayenne pepper or smoked paprika for some heat and depth.
Garlic and onions: For a savory, aromatic touch, crush a few garlic cloves or add sliced onions.
5. Should I rinse the chicken after brining?
Yes! Once you’ve removed your chicken from the brine, give it a quick rinse under cold water to remove any excess salt or spices on the surface. This helps prevent the chicken from becoming too salty. After rinsing, pat the chicken dry with paper towels—this will also help with browning and crisping the skin if you’re roasting or frying.
6. Can I brine chicken overnight?
Yes, you can brine chicken overnight (especially if you’re brining a whole chicken). Just make sure to keep it in the fridge to maintain a safe temperature. For smaller pieces like breasts, I recommend sticking to the shorter brining times to avoid over-seasoning.
7. Can I use a brine bag instead of a container?
Absolutely! A brine bag is a great option, especially for whole chickens. Simply place the chicken and brine in a large resealable bag, seal it, and refrigerate. This ensures the chicken is fully submerged, and cleanup is a breeze.
Brining might seem like a small extra step, but it’s one that guarantees big flavor and tenderness. With these answers, you’re all set to brine like a pro! Have fun with the process and enjoy the juiciest chicken you’ve ever made.